
Salesforce Commerce Cloud
Wizit LINK Integration SFRA (Storefront Reference Architecture)
Summary
This implementation guide describes how to integrate Wizit Payment Processor (int_Wizit_sfra) into Salesforce Commerce Cloud (SFCC) reference application SFRA version 6.2.0.
This cartridge provides the ability to use Wizit as a Payment Method during the checkout of the SFCC storefront.
1. Wizit
- Wizit is a service that offers an order to be paid in 4 fixed instalments at a fixed frequency of 2 weeks each.
- The Wizit – Salesforce cartridge enables Wizit to be offered as a Payment Method.
i. This cartridge displays the Wizit ‘Payment Breakdown’ on the Product, Cart and Checkout Pages.
ii. This cartridge enables the Consumers to select Wizit as a Payment method on the Checkout page. - This is only available in Australia region.
- Purchases are split into 25% increments, and this cannot be adjusted.
- Repayment is made every 2 weeks, and this cannot be adjusted.
- Repayments are made via a Credit or Debit Card (Visa and Mastercard are accepted).
- Merchant refunds will always apply any amount to the last ‘repayment’ to the first.
i. In a scenario where $100 has been purchased, and the 1st instalment of $25 has been paid; but a ‘full’ refund is requested.
ii. A refund of $100 is requested via the Wizit Merchant Portal
iii. $75 is nullified (the 4th, 3rd, 2nd instalments) as they have not yet been paid.
iv. $25 (1st instalment) is refunded back to the consumer
2. Regionality
- The Wizit Cartridge can be used for purchases from Australia only (assuming relevant commercial agreements are in place).
i. Consumer Orders can be delivered to addresses in Australia.
ii. AUD is the only currency serviced by Wizit, transactions made in other currencies are not valid.
3. Transactions / Refunds / Settlements Information
- Wizit has a ‘Merchant’ Portal, in which Merchants can access their transactions, organise refunds or review settlement information.
Component Overview
1. Functional Overview
Wizit provides a payment processing gateway. Wizit’s payment gateway connects your storefront to process transactions that allow customers to purchase products.
2. Use Cases
Allows checkout using Wizit payment method.
Allows refund using SFCC Business Manager Module.
3. Limitations, Constraints
This integration is only for SFRA.
The following Wizit APIs are supported.
- Get purchase limit
- Get payment token
- Order transaction status
- Order transaction capture
- Create refund
4. Compatibility
Compatibility mode version that was tested against is 22.7.
5. Privacy, Payment
This integration requires access to the following customer data elements: Billing Address, Shipping Address, Order Details and Customer Profile details.
No credit card details are stored within SFCC using this integration.
Token returned from the Wizit token service is saved in the Order section of the SFCC.
Integration Guide
Below are the steps to integrate the cartridge.
1. Download cartridge
The cartridge can be downloaded from <https://wizit.money/plugin/sfc/link_wizit_sfra.zip>
2. Activating the Cartridges in Business Manager
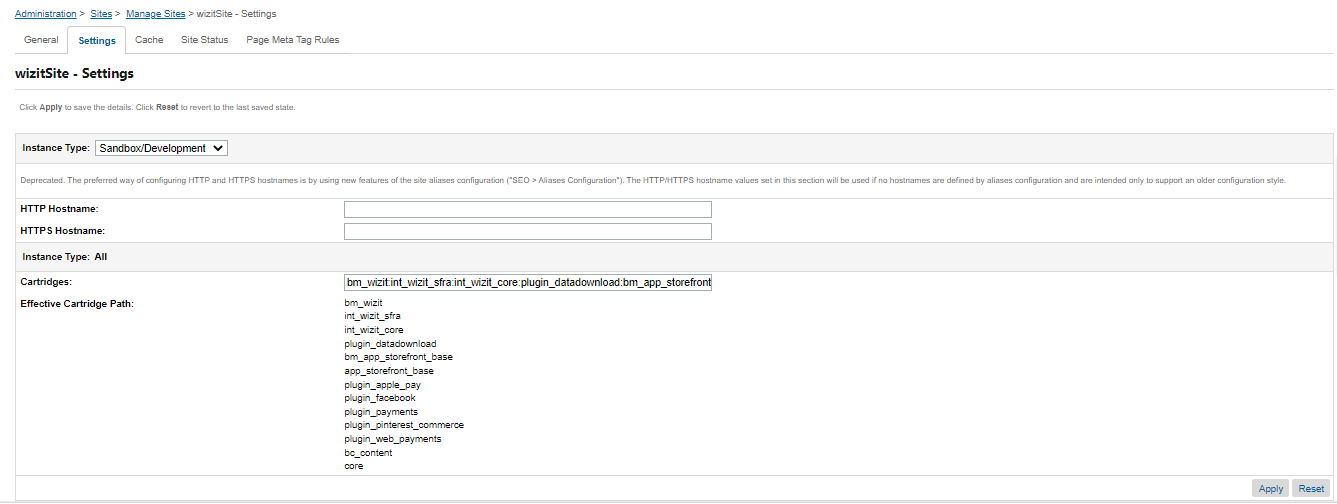
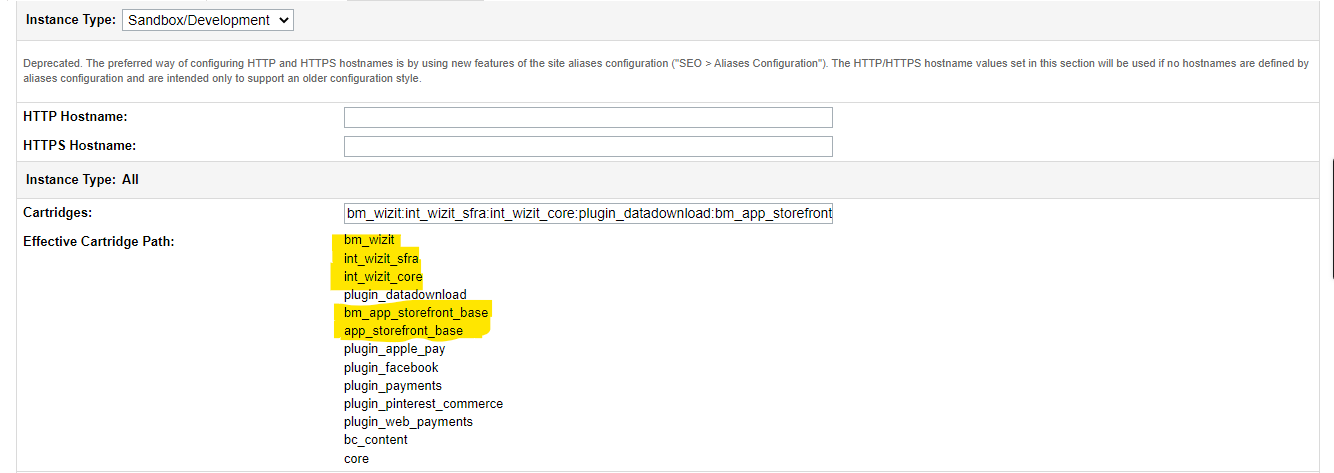
Before the Wizit functionality can become available to SFRA, the cartridge names have to be added to the cartridge path of the Site’s settings. In order to do this, follow the below instructions:
- Log into Business Manager
- Navigate to Administration > Sites > Manage Sites.
- Click on the target site name and Click on Settings tab.
- In the Cartridges prepend the cartridge name int\_wizit\_sfra:int\_wizit\_core
- Navigate to Administration > Sites > Business Manager and then Prepend bm\_wizit:int\_wizit\_sfra:int\_wizit\_core in the site path
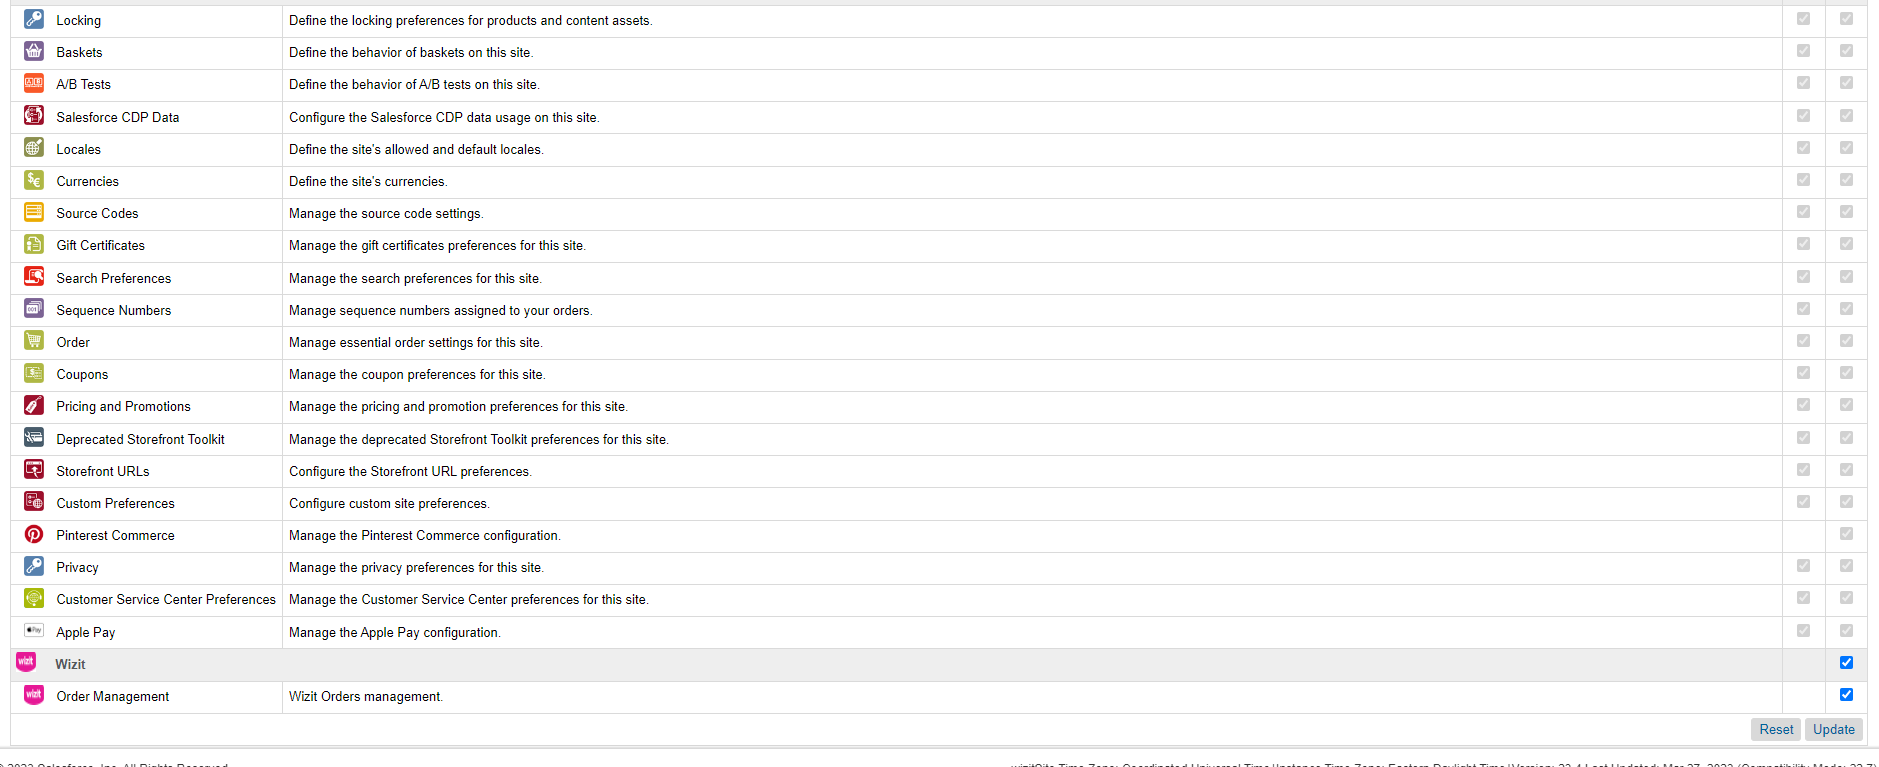
- Activate Business manager cartridge Go to Administration > Organization > Roles > Administrator - Business Manager Modules
- Select your site for which this module needs to be activated
- Select wizit and click update
3. Code changes in javascript
This chapter will describe how to update frontend JavaScript code for SFRA.
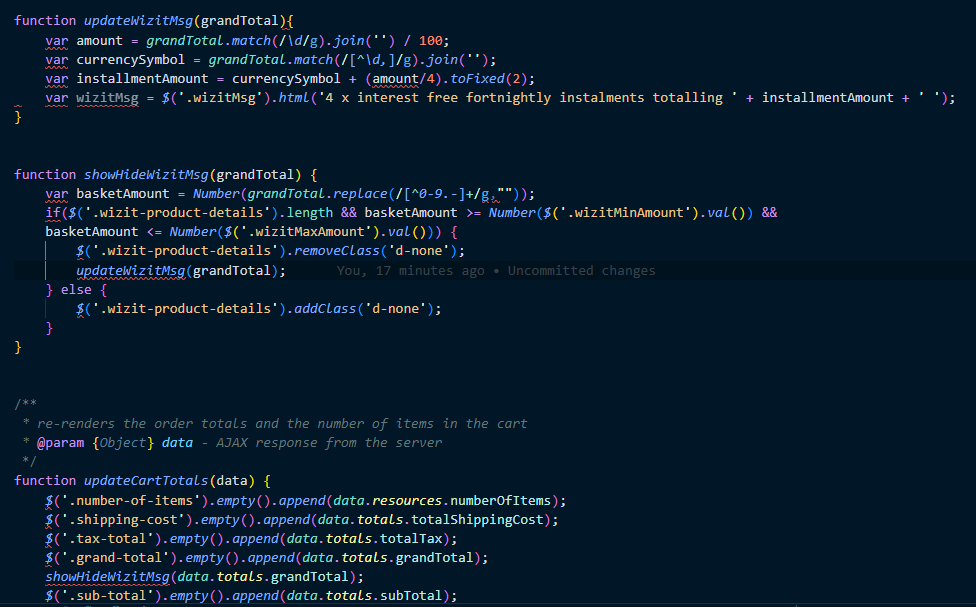
Add this code in \cartridge\client\default\js\cart\cart.js
function updateWizitMsg(grandTotal){
    var amount = grandTotal.match(/\d/g).join('') / 100;
    var currencySymbol = grandTotal.match(/[^\d,]/g).join('');
    var installmentAmount = currencySymbol + (amount/4).toFixed(2);
    var wizitMsg = $('.wizitMsg').html('4 x interest free fortnightly instalments totalling ' + installmentAmount + ' ');
}

function showHideWizitMsg(grandTotal) {
    var basketAmount = Number(grandTotal.replace(/[^0-9.-]+/g,""));
    if($('.wizit-product-details').length && basketAmount >= Number($('.wizitMinAmount').val()) &&
    basketAmount <= Number($('.wizitMaxAmount').val())) {
        $('.wizit-product-details').removeClass('d-none');
        updateWizitMsg(grandTotal);
    } else {
        $('.wizit-product-details').addClass('d-none');
    }
}
Then call this code from UpdateCartTotals method with cart.js
showHideWizitMsg(data.totals.grandTotal);Here is the example screenshot
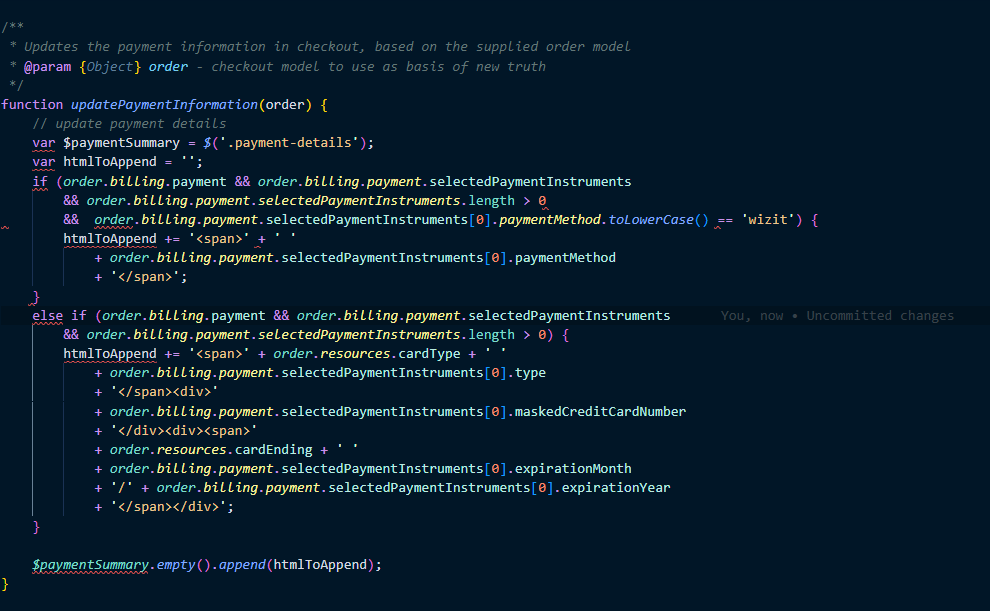
Next open \cartridge\client\default\js\checkout\billing.js and introduce a 'if' check in it for wizit payment method to show on checkout. Add this code before 'if' condition and put the existing 'if' condition in ‘else if’
if (order.billing.payment && order.billing.payment.selectedPaymentInstruments
        && order.billing.payment.selectedPaymentInstruments.length > 0 &&  order.billing.payment.selectedPaymentInstruments[0].paymentMethod.toLowerCase() == 'wizit') {
        htmlToAppend += '<span>' + ' '
            + order.billing.payment.selectedPaymentInstruments[0].paymentMethod
            + '</span>';
} else
Here is the example screenshot
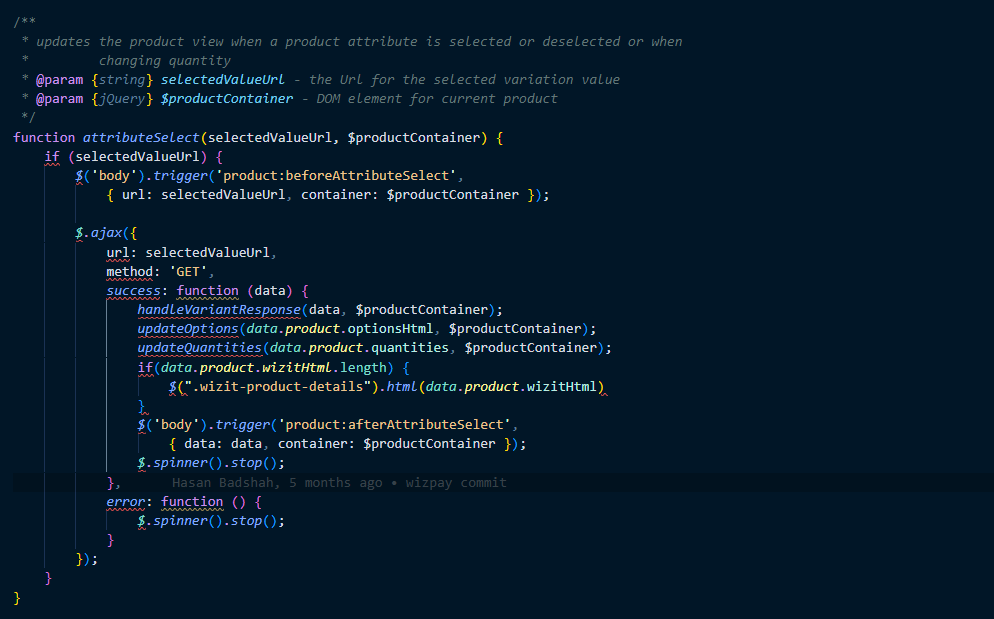
Now go to \cartridge\client\default\js\checkout\billing.js and add this code
if(data.product.wizitHtml.length) {
  $(".wizit-product-details").html(data.product.wizitHtml)
}
Here is the example screenshot
4. Importing Metadata
For the Wizit integration to work, the following object structures (metadata) needs to be imported and configured in the Business Manager.
- System Objects
Navigate to Administration > Site Development > Import & Export.
Upload the systemobject.xml and then import. - Job
Navigate to Administration > Operations > Import & Export.
Upload the job.xml file and then import in the Jobs. - Services
Navigate to Administration > Operations > Import & Export.
Upload the job.xml file and then import in the Services. - Custom Object
Navigate to Administration > Site Development > Import & Export.
Upload the file customobject.xml and then import. - Payment Method
Navigate to Merchant Tools > Ordering > Import & Export.
Upload the file paymentmethod.xml and then import into the Payment Methods Section. - Payment Processor
Navigate to Merchant Tools > Ordering > Payment Processors.
Create the payment processor WIZIT\_CREDIT.
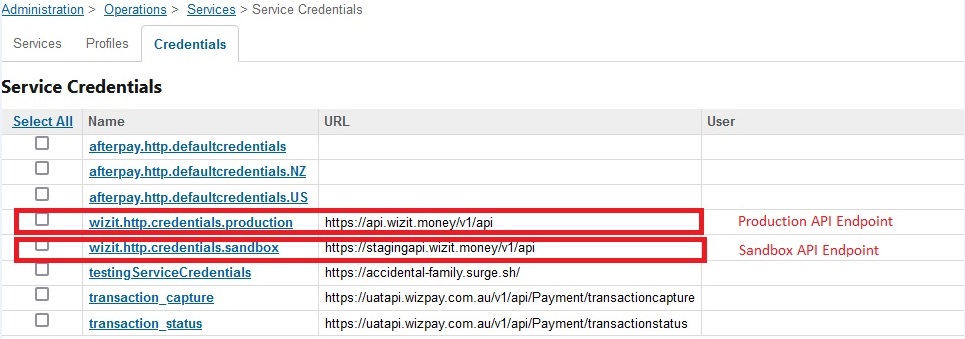
Navigate to Administration > Operations > Services > Credentials.
Check if the two endpoints has been installed.
5. Setting Wizit Custom Site Preferences
In Business Manager, navigate to the Site > Site Preferences > Custom Preferences. A custom site preference group with the ID wizit is available. Please select it and edit the attributes according to your Wizit account data and the data shown below.
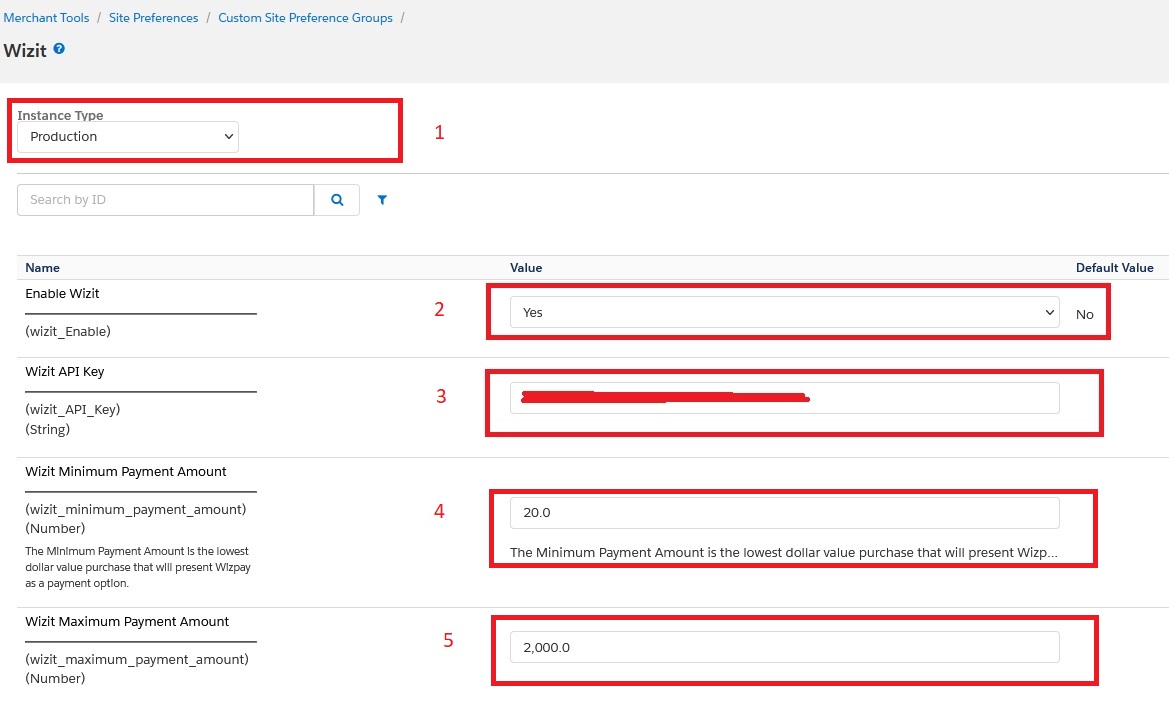
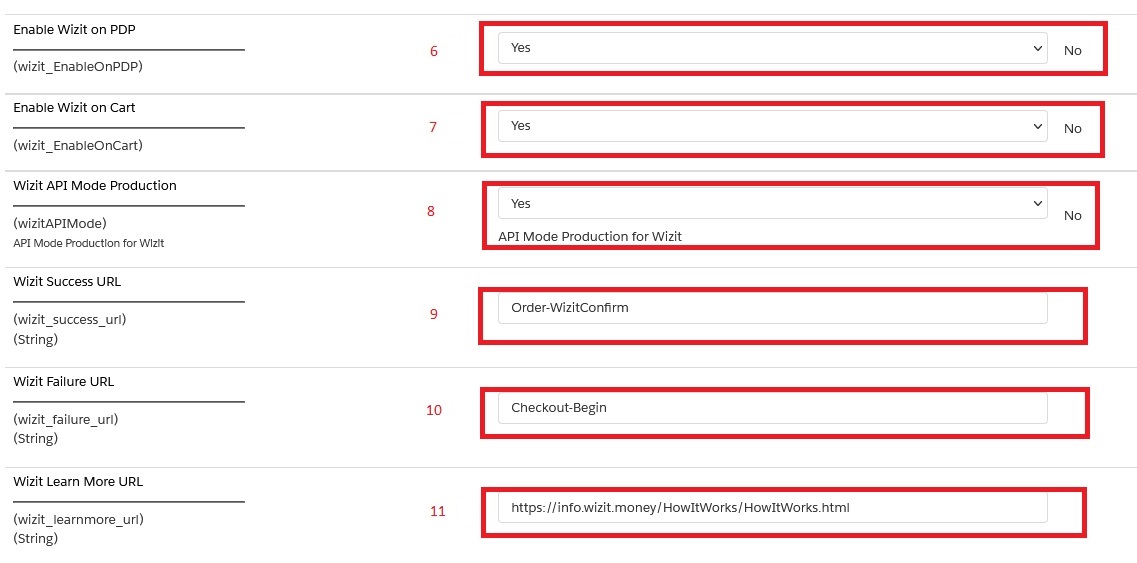
| Site Preference | Description | Values |
|---|---|---|
| Select Environment Production for Production API environment/ Sandbox for sandbox API environment | Production/Sandbox |
| To enable wizit cartridge in checkout | Yes/No |
| API Key will be used in wizit service calls. API key for staging and production are different. | |
| Minimum amount set by the merchandiser to use to order on their site. This way the min max storefront wizit purchase option will be show/hide. | |
| Max amount set by the merchandiser to use to order on their site. This way the min max storefront wizit purchase option will be show/hide. | |
| Enable wizit on product detail page | |
| Enable wizit on cart | |
| API Mode Production for Wizit | Yes / No |
| Call back url, on which user will land after successful transaction. | Order-WizitConfirm |
| Call back url on which user will land after failure transaction | Checkout-Begin |
| <https://info.wizit.money/HowItWorks/HowItWorks.html> |
6. Setting Wizit Payment Method
Confirm that a payment method with the name WIZIT is available that was imported.
7. Setting Wizit Payment Processors
Confirm that a payment processor with the name WIZIT_CREDIT is available that was imported.
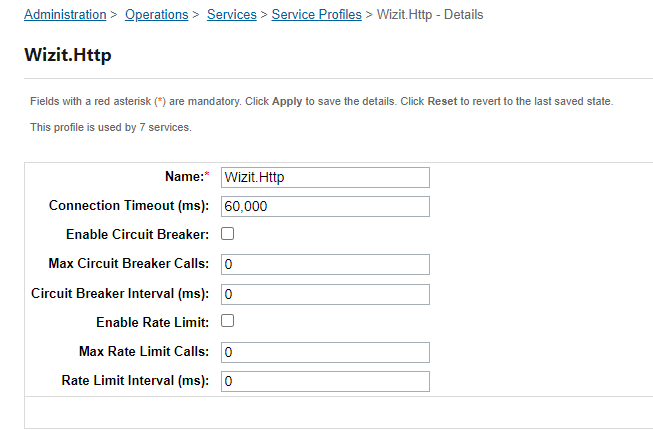
8. Setting SFCC Service
- Wizit.http.defaultendpoint
- Profile: Wizit.Http
- Credentials:
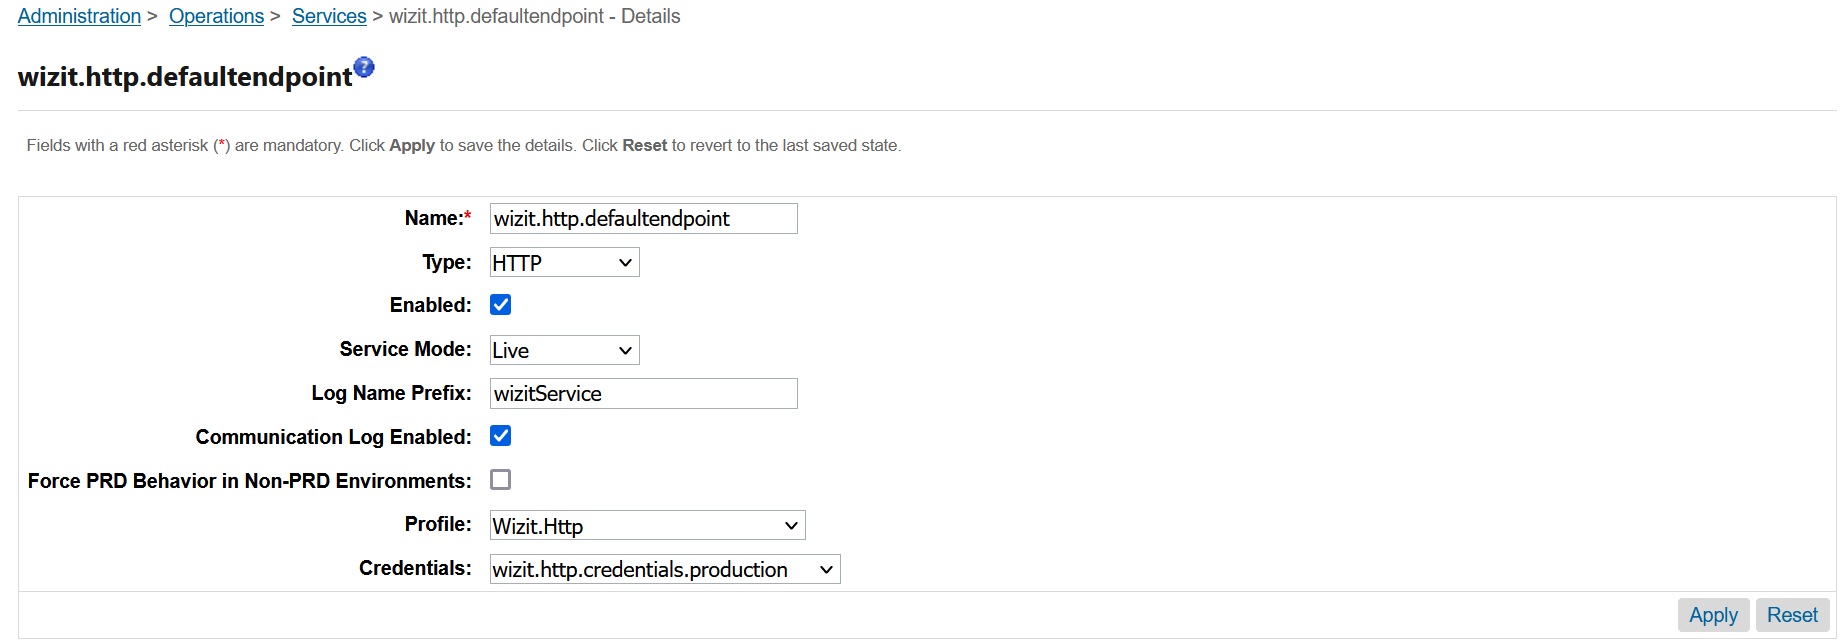
There are two credentials are available for the Wizit services.
wizit.http.credentials.sandbox
wizit.http.credentials.production
if wizitAPIMode custom preference is disabled then sandbox mode will be used, otherwise production mode will be used.
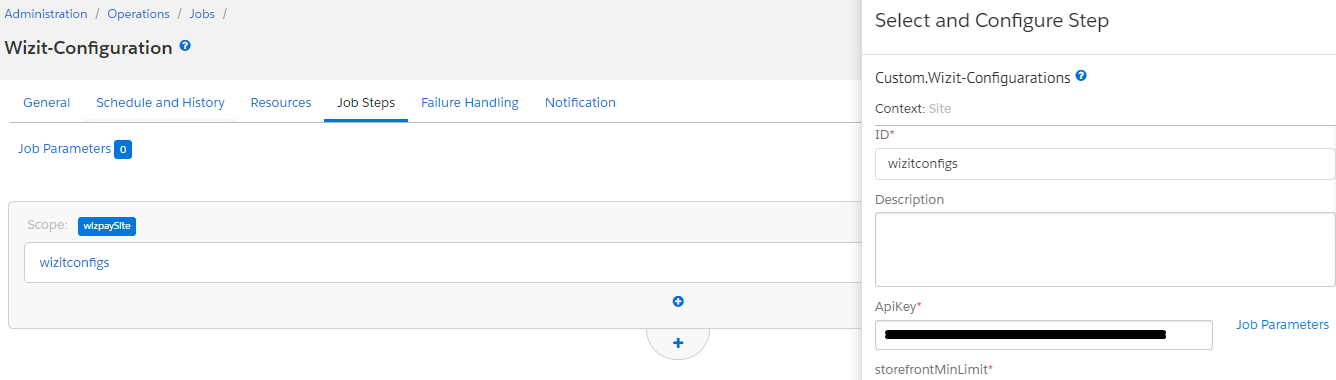
9. Setting up Job Schedule
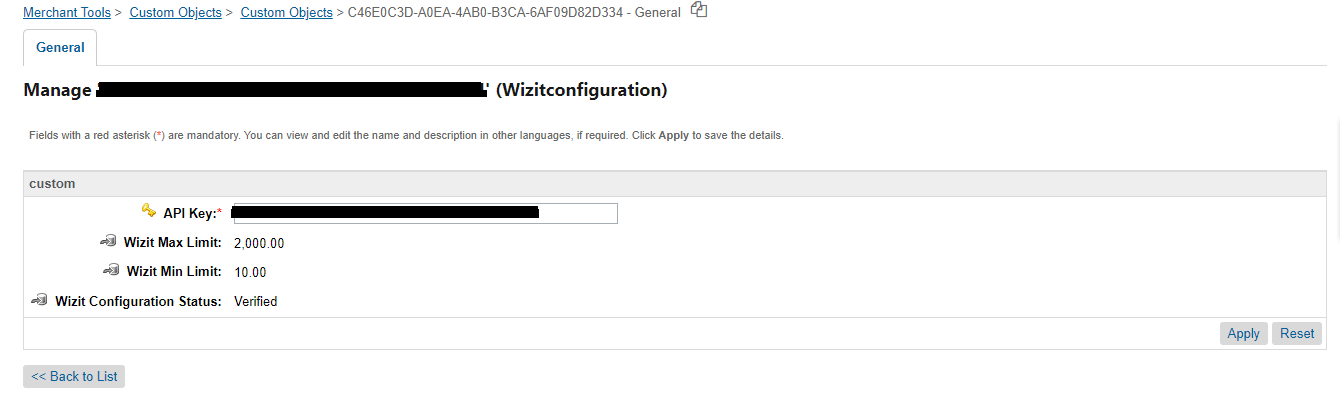
Job ID: Wizit-Configuration
This job is not directly handling/changing any of frontend user experience. This job fetches the min max order amount from the wizit portal by calling purchase limit endpoint and saving it in a custom object. Merchandizer can consider this custom object as a master configuration and can set the storefront min max allowed limits in custom preference by checking this master min max amount range.
Put the Wizit API Key given to you from your account representative here. NOTE: INSTALLING THE WIZIT CARTRIDGE AND NOT SAVING THE API KEY CAN CAUSE ISSUES WITH PAYMENT PROCESSING. ENSURE THAT THE API KEY IS SAVED.
Job:
Custom object:
Put the Wizit API Key given to you from your account representative here. NOTE: INSTALLING THE WIZIT CARTRIDGE AND NOT SAVING THE API KEY CAN CAUSE ISSUES WITH PAYMENT PROCESSING. ENSURE THAT THE API KEY IS SAVED.

Operations, Maintenance
1. Data Storage
Some additional custom attributes are stored against system objects. The following table lists these attributes and their uses , other than Site Preferences (which are listed under section 3.2.2).
| Object | Attribute | Type |
|---|---|---|
Order |
Wizit Order ID |
Boolean |
Order |
Wizit Token JSON |
Text |
Order |
Wizit Order Transaction Status |
String |
Order |
Wizit Order Total Amount |
Number |
Order |
Wizit Order Refunded Amount |
Number |
2. Availability
If the Wizit service is unavailable the user will not be able to checkout using this payment method.
The service availability can be tracked in SFCC using the Service Status.
3. Support
For support please contact [email protected]
User Guide
1. Roles, Responsibilities
Integration of this cartridge will typically be done by an SFCC developer.
Wizit will provide End points of the services and the API KEY to be configured in Job.
2. Business Manager Refund Transaction
For the Wizit integration to work, the following needs to be configured in the Business Manager.
- Upload the cartridge bm\_Wizit and int\_Wizit\_core into server.
- Go to Business Manager Menu > Administration > Manage Sites > Business Manager > Settings > Cartridges input field add cartridge name “bm\_Wizit: int\_Wizit\_core".
- Administration > Organization > Roles > Administrator > Business manager modules > Select context (select your site) > enable the Wizit transactions management
Testing
Checkout Flow:
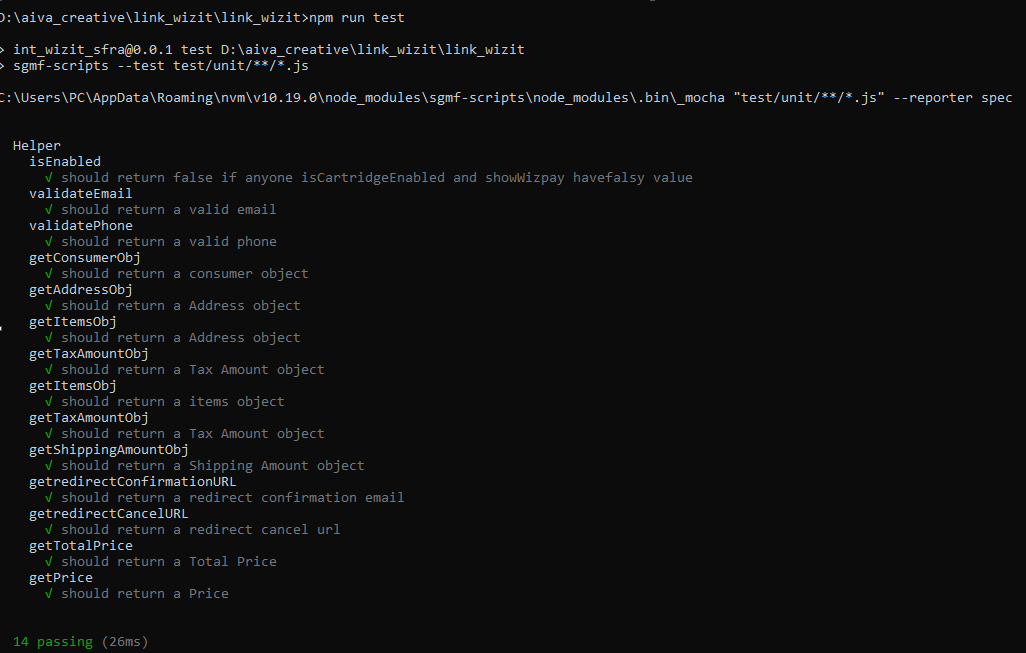
Once the cartridge is installed and integrated based on instructions, please try to place an order on your sandbox to test the functionality. Here is unit test coverage screenshot
Release History
| Version | Date | Changes |
|---|---|---|
| 22.1.0 | 2023 | Initial release |
Update cartridge
Check for Updates in the Salesforce Commerce Cloud Marketplace:
- Log in to the SFCC Business Manager and navigate to Marketplace (or visit xchange.salesforce.com).
- Search for the Wizit Gateway Cartridge
- Check if a newer version is available
- Open UX Studio (Eclipse IDE with Salesforce plugin) or your preferred IDE (e.g., VS Code with SFCC extensions).
- Select the downloaded Wizit cartridge .zip file and import it into your workspace.
- In Business Manager, go to Administration > Sites > Manage Sites > [Your Site] > Settings, Locate the Cartridges field and ensure the updated Wizit cartridge. Click Apply to save changes.
- If the updated cartridge includes metadata, Go to Business Manager > Administration > Site Development > Site Import & Export. Click Upload under Import & Export Files, select the metadata .zip or .xml file from the cartridge, and click Import
- Clear the system cache in Business Manager > Administration > Site Development > Cache by clicking Clear Cache.
Updated about 1 year ago